This article is part of the BUAA Operating Systems course preparatory tutorial. This version was written by me.
In 2024, the course lab environment was changed from GXemul to QEMU. To help students adapt to the new environment, two new articles were added to the preparatory tutorial: “GDB: Dissecting Programs” and “Introduction to the QEMU Emulator.”
An operating system is a program that runs directly on computer hardware, managing hardware resources below while providing unified services to software above. In this course’s labs, to develop and run our MOS operating system, we need a hardware system that supports OS execution — including a processor, memory, and peripherals (e.g., disk).
However, providing every student with physical hardware is impractical. Using an emulator is a far better choice. An emulator simulates the behavior and characteristics of computer hardware, allowing developers to run and test software in a simulated environment without actual physical hardware.
The emulator used in this course is QEMU. Let’s introduce it.
What Is QEMU?
QEMU (Quick Emulator) is a general-purpose, open-source machine emulator and virtualization tool written by legendary programmer Fabrice Bellard. QEMU provides cross-architecture hardware emulation, supporting x86, ARM, MIPS, RISC-V, and many other architectures.

Fabrice Bellard is the creator of QEMU, FFmpeg, and other renowned projects. His work spans operating systems (QEMU), compilers (Tiny C Compiler), graphics (TinyGL), telecommunications (Amarisoft), mathematics (Bellard’s formula), audio/video (FFmpeg), artificial intelligence (NNCP), and more — making outstanding contributions across many fields. A near-polymath figure.

QEMU has several usage modes. In this course, we primarily use QEMU’s system emulation mode. In this mode, QEMU simulates processor execution and various hardware device behaviors, providing a complete virtual machine model including processor, memory, and peripherals. On top of this model, we can run a full operating system without any additional hardware.
QEMU offers highly customizable hardware emulation, making it easy to set up runtime environments for specific hardware platforms. It also natively supports GDB debugging, streamlining the development process. This is why QEMU has become an essential tool in low-level development.
How QEMU Works
This section is not required for the course. Read at your own interest.
Before discussing QEMU’s internals, let’s understand virtualization technology. Here, virtualization specifically means hardware virtualization: hiding real physical hardware and simulating a specific hardware environment with software, so the OS running inside it feels like it’s on real physical hardware. The simulated hardware environment is called a Virtual Machine (VM), and the program that implements virtualization is called a Hypervisor. Essentially, a hypervisor is a type of middleware.
Virtualization abstracts away underlying hardware differences, allowing many different OS environments to run on a single physical machine, fully utilizing hardware resources. Virtualized environments are also easy to migrate between machines, facilitating system management and maintenance.
Based on implementation, hypervisors are divided into Type 1 and Type 2:
- Type 1 hypervisors run directly on bare metal, as shown in figure (a) below. The hypervisor essentially occupies the OS’s position, partitioning the physical machine into multiple VMs.
- Type 2 hypervisors run on top of an operating system, as applications within the OS, as shown in figure (b). The machine running the hypervisor’s host OS is called the Host, and VMs inside the hypervisor are called Guests. Since Type 2 hypervisors simulate processors in software and interpretively execute machine code, they are also called simulators.
Type 1 hypervisors are mainly used in enterprise data centers and servers. Common products include KVM, VMware ESXi, etc. Type 2 hypervisors are typically used on personal computers, allowing VMs to run alongside other processes. Common products include VMware Workstation, Oracle VirtualBox, and QEMU.
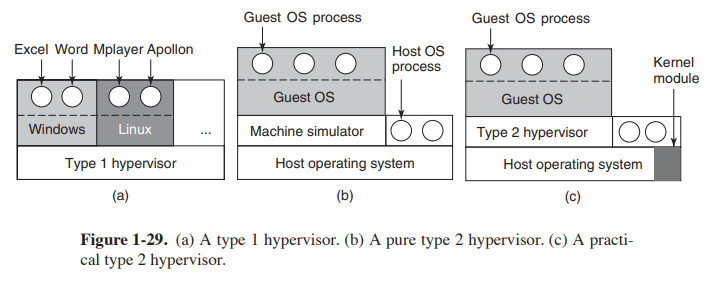
Image from Andrew S. Tanenbaum — Modern Operating Systems (4th Edition)
Now back to QEMU. QEMU implements hardware emulation in software, making it a Type 2 hypervisor. But unlike many Type 2 VMs, QEMU implements instruction-set-architecture-level virtualization, enabling it to run programs of different architectures on a single machine.
The simplest way to implement Type 2 virtualization is an interpreter that reads machine code instruction by instruction and simulates processor behavior. But this is far too slow. So QEMU uses Dynamic Binary Translation (DBT): using an intermediate representation as a bridge, it translates guest-architecture machine code Just-In-Time (JIT) into host-architecture machine code, which the host processor then executes directly. This gives QEMU decent performance across different architectures. QEMU’s virtualization acceleration mechanism is called TCG (Tiny Code Generator).
QEMU can also leverage other hypervisors for acceleration. The most common is KVM (Kernel Virtual Machine). KVM is a Linux kernel driver module that uses hardware-assisted virtualization, turning a Linux host into a hypervisor. Since KVM sits directly on hardware, it’s a Type 1 hypervisor.
Because KVM bypasses the OS to directly access hardware, it outperforms pure QEMU. When QEMU works with KVM, QEMU handles I/O virtualization while KVM handles processor and memory virtualization. This approach greatly improves performance over pure QEMU while retaining the cross-architecture capabilities that pure KVM lacks. This combination plays to each one’s strengths. This acceleration mode corresponds to figure (c) above.
Using QEMU
In the labs, all QEMU operations are already scripted in the Makefile. So if you’re just here to complete the labs, you don’t need to learn QEMU usage at all.
But knowing a bit more about QEMU won’t hurt — it might even deepen your understanding of operating systems. So in this section, we’ll run a bare-metal Hello, world program in QEMU on MIPS, so you can see how a kernel program runs inside QEMU.
- You can complete the following on the course’s jump server, saving you from setting up a development environment.
- If you’re reading this before starting the labs, don’t worry about understanding the source code’s specifics.
A bare-metal Hello, world executable might look like this:
// minimal_hello_world.c
void printch(char ch) { *((volatile char *)(0xB80003f8U)) = ch; }

void print(char *str) {
    while (*str != '\0') {
        printch(*str);
        str++;
    }
}

void __start() {
    print("Hello, world!\n");
    while (1) {
    }
}
Note: we didn’t define
main.__startis the program’s entry point.
Compile with the cross-compiler mips-linux-gnu-gcc:
$ mips-linux-gnu-gcc \
        -EL \
        -nostdlib \
        -o hello_world.elf \
        minimal_hello_world.c
This produces hello_world.elf. Now run it with QEMU.
A quick intro to QEMU commands: all are qemu-* form. For emulating a specific architecture, use qemu-system-*. For little-endian MIPS, it’s qemu-system-mipsel. Other CLI tools include qemu-img for creating, converting, and modifying disk images.
To run our program:
$ qemu-system-mipsel \
        -m 64 \
        -nographic \
        -M malta \
        -no-reboot \
        -kernel hello_world.elf
Hello, world!
After printing “Hello, world!”, our program enters an infinite loop. Press
Ctrl+AthenXto exit the emulation.
Option explanations:
-m: VM memory size.-nographic: No graphical output; use serial console.-M: Target machine to emulate — here, the MIPS Malta development board.-no-reboot: The VM exits directly instead of rebooting.-kernel: The kernel (ourhello_world.elf) to boot.
Our example doesn’t need peripherals, but the MOS labs also require disk emulation, which uses the -device option to configure emulated devices.
Debugging with GDB in QEMU
The main reason this course uses QEMU is its native GDB debugging support, providing an excellent debugging experience. Let’s walk through GDB debugging in QEMU using the program from the previous section.
We recommend reading “GDB: Dissecting Programs” before continuing.
First, compile with -g for a debug build:
$ mips-linux-gnu-gcc \
        -g \
        -EL \
        -nostdlib \
        -o hello_world.elf \
        minimal_hello_world.c
To enable GDB debugging in QEMU, add -s -S. -S tells the emulator not to start the processor immediately; -s makes it wait for a GDB connection on port 1234.
Yes, GDB and QEMU collaborate through a remote connection, even when running on the same machine. This is called remote debugging — it lets you debug programs on remote hosts, providing extra flexibility for various debugging scenarios (like this one).
Start QEMU in the background (since we need both QEMU and GDB in the same terminal). Redirect stdin to /dev/null:
$ qemu-system-mipsel \
        -s \
        -S \
        -m 64 \
        -nographic \
        -M malta \
        -no-reboot \
        -kernel hello_world.elf \
        < /dev/null \
        &
Check running processes:
$ ps
  PID TTY          TIME CMD
  248 pts/3    00:00:00 bash
 2708 pts/3    00:00:00 qemu-system-mip
 2793 pts/3    00:00:00 ps
Now start GDB. But our host is x86 while the program is MIPS. Just as we needed an architecture-specific compiler and emulator, we need an architecture-specific debugger, right?
Correct — plain gdb only debugs programs of the current architecture. To debug MIPS programs, the course environment also provides gdb-multiarch.
gdb-multiarch is the multi-architecture version of gdb, supporting many architectures including MIPS. Enter it and try tab-completing set architecture — you’ll see over 200 options:
$ gdb-multiarch
...
(gdb) set architecture
Display all 200 possibilities? (y or n)
Its usage is essentially identical to gdb. So let’s load our program:
$ gdb-multiarch hello_world.elf
...
Reading symbols from hello_world.elf...
(gdb)
We haven’t connected to QEMU yet. Enter remote debugging mode with target remote <address> — here, localhost:1234:
(gdb) target remote localhost:1234
Remote debugging using localhost:1234
0xbfc00000 in ?? ()
To do this in one command:
gdb-multiarch hello_world.elf -ex "target remote localhost:1234". The-exoption executes a GDB command after startup.
In QEMU debugging, we can’t use run or start. Instead, use a breakpoint plus continue to reach __start:
(gdb) b __start
Breakpoint 1 at 0x4001e8: file minimal_hello_world.c, line 11.
(gdb) c
Continuing.

Breakpoint 1, __start () at minimal_hello_world.c:11
11          print("Hello, world!\n");
From here, debugging proceeds as normal. One critical note: before exiting, use kill to terminate the QEMU process. If you just quit GDB, it only detaches from QEMU — the QEMU process keeps running and continues occupying port 1234, preventing new QEMU debug sessions.
If you forget to kill QEMU, don’t panic. Find it with
ps -ef | grep qemu:$ ps -ef | grep qemu yourname 717 246 0 13:43 pts/3 00:00:00 qemu-system-mipsel -s -S ...The second column is the PID. Kill it with
kill -9 <pid>:$ kill -9 717Or even simpler:
pkill -9 qemu.